
AppleInsider is supported by its audience and may earn commission as an Amazon Associate and affiliate partner on qualifying purchases. These affiliate partnerships do not influence our editorial content.
Shifting from Windows to Mac could be a great but daunting idea for people unfamiliar with Apple’s operating system, macOS. Here’s everything a potential PC-to-Mac switcher should consider when jumping platforms.
People can switch platforms for many different reasons, ranging from frustration with their existing environment to being required to move for work or plain old curiosity. In some cases, switching could be foisted onto an unsuspecting user, such as if a family member gives them a Mac.
Whatever the reason for the move from Windows to Mac, the decision to do so is only the first step. Next, you have to migrate your computing environment over from Windows to something new and unfamiliar.
It may seem like a massive leap, but it’s a lot easier for a person to go through than you’d think. Here is a list of things you need to know and think about before or during the switch.
PC to Mac Switching – Hardware
Moving to macOS is arguably the tricky bit of the process, as the hardware side is pretty easy to understand.
While Apple offers multiple different Macs to consumers, they all fundamentally work in similar ways. Much like how a Windows notebook can be like a desktop PC but portable, it’s the same idea for a MacBook Pro compared with a 24-inch iMac.
Unlike buying a PC, there’s less need to look into that many specifications for parts on the Mac side. The current range offers some configuration options at the time of purchase, but certainly not where you have even to consider buying aftermarket parts to add manually.
You don’t have after-purchase upgrades available to you, but it does make buying hardware much more straightforward. In effect, you get to decide whether you want a portable MacBook or a desk-bound Mac, how powerful the chip and GPU combination you want, if you need a display for the desktop, how much storage you want, and how much memory.

There’s also nothing to worry about regarding connections, as current-gen Macs all offer fairly standard connectivity options. You have your main ones, including HDMI for video, USB-C and USB-A ports, an Ethernet port, and a memory card slot, if applicable.
For the most part, these are all connections that will probably correlate with accessories that you may already use with the PC. You’ll undoubtedly be able to hook up your keyboard and mouse, and if your monitor doesn’t happen to have HDMI, you can always get an adapter to get video to work.
Wireless is also a big deal, especially for the MacBook Air and MacBook Pro lines, but it’s not that different from the Windows experience. You get Wi-Fi and Bluetooth support that works fine with Bluetooth accessories and Wi-Fi networks, and they generally work without needing to do anything.
The underlying theme here is that there’s nothing to worry about hardware-wise. It’s all relatively straightforward.
PC to Mac Switching – Software and Apps
Many years ago, there was a time when potential switchers wouldn’t because they’d fear that there would be significant changes in how they work. Not just the small things like window controls, but bigger stuff, like the software they use.
This has become far less of a problem, with major software releases typically being produced for both Windows and Mac. Big-hitters like Microsoft Office, Adobe Creative Cloud, and other highly-used apps and services offer versions of the software for macOS and Windows.
Then there are the plethora of online services like Skype, Slack, and Zoom that naturally work across multiple devices. You can find many such apps that work on Windows, macOS, iOS, Android, and other platforms to work wherever the user needs to use them.
Occasionally, developers create Windows-only apps and not expand onto macOS, but that happens far less often. In such cases, you may even find a macOS-based developer who makes an equivalent app on macOS.
Sure, you could use Adobe Photoshop on macOS, but you can open those same files in Pixelmator Pro.
If immediacy is an issue, Apple has also worked to make it as easy as possible for you to get started doing work or being creative right out of the box. Included as part of macOS, users can enjoy many apps such as the iWork suite, Safari and Mail, GarageBand for music creation, and iMovie for videos, among others.
As for getting apps onto the Mac, you have a few options. The easiest is via the Mac App Store, which is effectively the same as the App Store used on iPhone and iPad, except leaning towards macOS hardware.
As a side point, with Apple’s introduction of Apple Silicon, it means a Mac can run apps initially made to run on iOS and iPadOS. Yes, the apps you can use on an iPhone or iPad can run on a Mac or MacBook since they share a very similar architecture.
Apple has made it relatively simple for developers to convert their iPadOS apps to run on macOS, and you’ll see more apps enabling macOS support in the future.
The Mac App Store is a great resource, but you can also get your software online in other ways. This includes downloads direct from the developer and third-party storefronts like Steam.
While Apple does include various security measures to prevent users from installing malware, you should still exercise caution online and only download from places you trust.
If you are in a situation where there is software only available for Windows that you absolutely need to run, but there’s no macOS equivalent, it’s still possible to use it.
For older Intel-based Macs, you can install Windows on the Mac using Bootcamp. This puts an entire Windows installation on the Mac, which you can boot into whenever you want.
As Bootcamp isn’t available for Apple Silicon Macs at the time of publication, modern Macs will have to go down the virtualization route. Software like Parallels can be used to run Windows software within macOS itself, saving you from having to switch operating systems all the time.
Remember that unless you’re giving away the PC, you’ll still have it available to use. You can always keep it around to run that specific software.
PC to Mac Switching – Your data
The good thing about having so many applications working cross-platform is that files and documents created on one platform will almost certainly work, or at least be viewable, on another. In most cases, you should have no real problem opening a file created on Windows within macOS.
This is quite obviously the case for software that has versions for both Windows and Mac, but it’s also possible for other software.
For example, Adobe Photoshop files created in Windows. You could certainly open it in Photoshop for macOS, but many other art apps can open the same file, like Pixelmator Pro.
You may not necessarily get full compatibility across different apps, but generally, you will get all or most of what you need from the file in the non-originating app. It may not work for everything, such as using a file created using a very old version of software on Windows and then attempting to open it on a more modern tool in macOS, but it should quite a lot of the time.
You could save files to an external drive for transfer, but there are other options.
This compatibility thing isn’t just something you see between different apps, but you can even see the occasional quirks within the same software between platforms.
Take, for example, Excel. As the Mac version uses different base dates for calculations to Windows, this can throw off some date-related mathematics in spreadsheets created on one platform that are opened on the other.
Such quirks are a rarity but not enough to be a problem most users will ever encounter.
PC to Mac Switching – Moving your data
While you may want to start completely from scratch on the Mac, most people will want to get their personal and work-related data transferred over. Given the high amounts of data that you may potentially have to shift, that could be a daunting prospect.
This isn’t as big a problem as you might think, as gradual changes in how people use computers have made it easier to change computers.
For a start, consider that practically everyone lives online, and in many respects, your data does so as well. So many applications and services either exist entirely on the Internet or use cloud storage in some capacity that it’s probable that you will have instant access to some of your data just by logging in.
Cloud storage services, such as iCloud, Google Drive, or OneDrive, can be used to store data that could be accessed on multiple devices, potentially simultaneously. For data that isn’t already in the cloud, consider this a way to make it accessible on both Windows and Mac and as a form of backing up.
You could also transfer data more directly, such as selecting and saving files from the PC to an external drive, then physically moving the drive to the Mac and copying them off again. This may take a lot of time to accomplish and does rely on you having an external drive in the first place.
As most households have a home network of some description, you could feasibly share folders and drives on the Windows PC, which could be accessed over the network on the Mac. As a side point, while you could copy the files across, you could feasibly leave the shared folders open and use the PC as a home server, accessing the data as and when you need it.
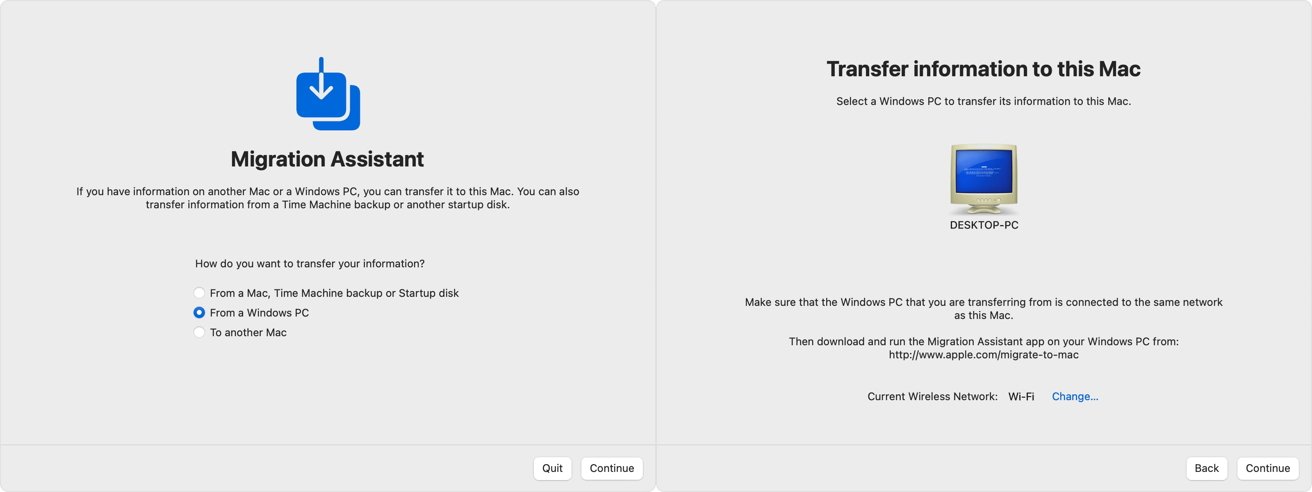
Migration Assistant
Naturally, Apple offers an option to automate the entire process. Migration Assistant transfers specific essential data from a Windows installation to the Mac.
As part of the transfer, Migration Assistant can also take data of specific types and automatically add them as part of counterpart apps in macOS. For example, contact lists, calendars, and email accounts can be transferred and put into the macOS Contacts, Calendar, and Mail apps on your behalf.
Migration Assistant can transfer files from your Windows PC and deposit them into correct places on the Mac.
The data that can be transferred includes the above, browser bookmarks, some system settings like desktop pictures, photographs and videos, iTunes content, files from the top-level folder of the user’s home directory, and other non-system files that it can find.
Your Windows PC needs to be running Windows 7 or later to perform the transfer, with the credentials to access an administrator account. You also have to connect the Mac and PC on the same network or even directly to each other using a single Ethernet cable.
You should also turn off automatic Windows updates on the PC, as they can interfere with the process.
How to use the Migration Assistant to move from a Windows PC to a Mac
- Download the Windows Migration Assistant on the Windows PC. There are multiple downloads to match the different releases of macOS, so select the most appropriate one for your Mac. It is most likely going to be the download for macOS Monterey if it is a new Mac.
- Open the Windows Migration Assistant and click Continue.
- You may be advised to turn off automatic Windows Updates if they are still enabled. Do so, and click Continue.
- If it is a new Mac, turn it on and wait for the Setup Assistant to run. If it has already gone through the initial setup, open Migration Assistant from the Applications folder.
- Follow the onscreen prompts on the Mac until you see the Migration Assistant screen. Select “From a Windows PC” then Continue.
- Select the Windows PC you are moving from by device name. Click Continue.
- Check the passcodes on both the PC and the Mac to ensure they are the same, then click Continue.
- After scanning Windows, select the data you want to transfer from the PC to the Mac, then click Continue to start the transfer.
- Once complete, log into the user account on the Mac.
- Proceed to authorize your Mac for iTunes Store Purchases. Do this by going to Apple Music, clicking Account in the menu followed by Authorizations, then Authorize This Computer. Log in with your Apple ID and click Authorize.
Post-Transfer Tips
After you have migrated over to the Mac, all that’s left is to get used to the new working environment. To help with this, Apple offers a list of tips and terms on its support pages, which can be handy for those initial days.
There are many elements that will be pretty much the same across both operating systems, albeit with some tweaks. For example, the window management buttons on the top-right of a window in Windows are in the top-left corner in macOS.
The Start button in Windows is replicated in macOS by clicking on the Launchpad icon in the dock. In Finder, the macOS version of Windows File Explorer, other applications are in a folder called Applications.
Essential keyboard shortcuts like Undo, Cut, Copy, and Paste are the same across Windows and Mac. Instead of using Control, you use Command-Z, Command-X, Command-C, and Command-V.
Other common shortcuts follow the same pattern, and many retain the same key combinations, except for the Control-Command switch.
The Control Panel in Windows has its analog in macOS, under System Preferences. You can get there by clicking the Apple icon in the menu, followed by System Preferences.
You should get a backup system in place to keep your data protected. Apple includes Time Machine as a backup system, which periodically saves versions of changed files to an external disk, which you can quickly access from the menu.
After all of the work moving your data from Windows to Mac, the least you can do is to safeguard it.
Lastly, remember that unless you’re passing on your Windows PC to someone else post-transfer, you will still have access to your data and your applications on your old machine. It may take a while to get used to macOS after a lifetime of Windows usage, but you’ll have a safety net on standby.
https://appleinsider.com/inside/mac/tips/how-to-switch-from-pc-to-mac-and-migrate-your-data-from-windows-to-macos
You may also like
-
Apple WWDC 2022 preview: New iOS, MacOS expected
-
Apple Releases macOS Monterey 12.4 With Support for Studio Display Webcam Update
-
Impressive iPhone Changes, MacBook Air Surprise, EU Regulations Threatens Apple
-
MacBook Air with M2 chip – Why Mac
-
Stage Manager is the new Mac multitasking interface we didn’t know we needed